Data masking
Configuration: DOC -> Administration -> Accounts -> Data masking
By enabling data masking, you can easily hide sensitive user or computer data as required by the General Data Protection Regulation (GDPR). Instead of showing the user or computer name, a substitute is displayed. This prevents the analysis of user behavior and, if configured accordingly, can help to make it impossible to draw conclusions about specific computer users.
A special role permission (role) is required for activating or deactivating data masking.
Data can also be masked in reports or you can remove data masking that has already been activated.
Please note that data masking is not yet implemented for the macOS agent.
In the Show unmasked data section, you can specify the conditions for temporarily unmasking the data for the current browser view. The data will still be displayed masked in all other views. This may be necessary, for example, to fix urgent issues that affect the system or to detect any unusual behavior on the user's part.
You also need special permissions to unmask the data. The following options are available here:
-
With role permission: The appropriate permission must be assigned.
-
With code: It is only possible to undo the masking when entering a code. The code must be requested separately and is valid for a certain period of time. This option is used if no one has access to the DOC, but it is mandatory to request data, for example, due to operational reasons. The code must be handled like a password, kept secret and entered on site.
-
With approval by: If you use this option, you need to provide a contact person to authorize unmasking. In the text field below, you can enter the required information (for example, name, phone number, e-mail address). This is also done in the DOC. This is where the request will be sent to and a response will be given accordingly (approval or rejection).
In the Data masking mode section you can specify which data you want to mask.
-
Full: All user and computer names are masked. Neither related entities, nor information in events, alerts or in security awareness sessions are displayed. It is not possible to draw any conclusions about the computer or the user. While this option provides the highest level of data protection, it may make troubleshooting more difficult.
-
Only user data: This option is useful when several users are working on the same computer. You will see only the computer names, the user names are masked. For troubleshooting, this is a good option to use.
In environments where it is easy to draw conclusions between computer names and users, it may be useful to have the computer names masked.
-
Individual: Click Configure to specify the context and the events where user or computer data gets masked. These settings allow you to precisely configure data masking and, for example, limit it to different events.
Please note that changes to the data masking mode must always be saved to take effect.
On the General tab you can select the following options:
-
Show user's computers: If you enable this option, the computers of a masked user will be displayed in the Related entities section in the Users view(End users on managed computers). Note that this may allow tracing the user through the particular computer.
-
Show 'Last logged in user' in plain text: In the Computers view, the name of the user who was last logged on to this computer is displayed in the Last logged on user column.
-
Show 'built-in user' in plain text: You also see the operating system accounts in all views when this option is enabled, for example NT-AUTHORITY\SYSTEM. This option is selected by default.
-
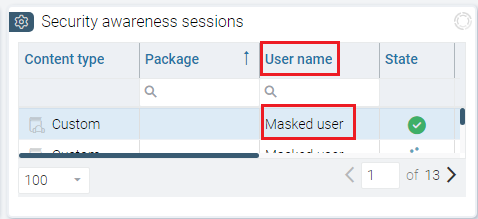
In addition, you can select the context to apply the data masking, e.g. for security awareness sessions.
On the Events tab, you can select individual or multiple events where you want to mask data.
Note that in the Inventory menu, in the overview of all users or computers , the respective names are always displayed in plain text. This is also the case when displaying group memberships. All other information is of course masked if set accordingly.
More options of data masking:
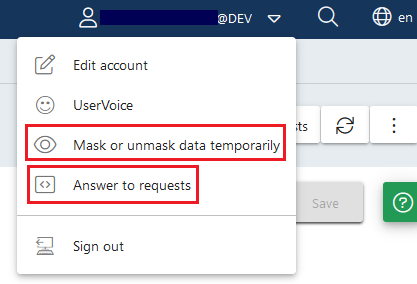
Use the Answer to requests button to approve or deny requests to unmask data. You can also select this option from the user's context menu (see figure).
Here you can also find the Mask or unmask data temporarily option for reversing the data masking. If data is already masked, a request to temporarily display the data in plain text, or in the reverse case, a request to temporarily mask the data quickly (for computer and/or user data respectively) can be made here. This may be relevant if you want to display data for demo purposes only in an 'anonymized' way and need to mask it for a short period of time.
Applying data masking when filtering by "user name".
If the user name filter is set in a widget and data masking is enabled at the same time, no data will be displayed (see figure). The system user is an exception. It is set with the help of the Ist Systembenutzer property.
Additional notes
When data masking is disabled, you cannot cancel but temporarily enable data masking with the Mask or unmask data temporarily option. In the opposite scenario, where all data is currently masked, you cannot mask any data, but you can temporarily unmask the data.
Example: All the user data is masked, but the computer data is not. An administrator wants to identify the user when a specific event occurs, so here it would be useful to show the data temporarily. In this case, the Mask or unmask data temporarily option can be used. At the same time, a temporary masking of the computer data can be requested.
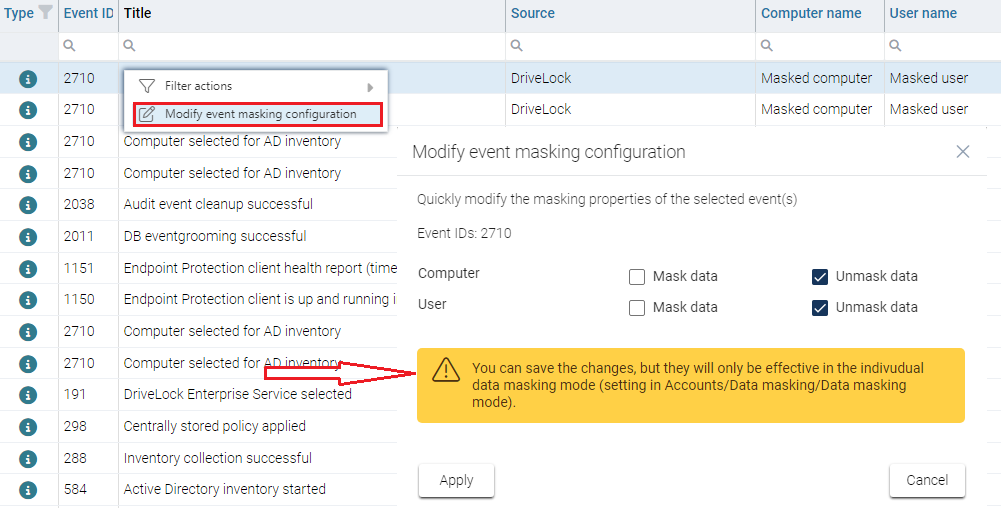
Changing the event masking configuration
For each event, you can change the data masking settings individually or by selecting multiple events.
These settings are convenient because they can be set quickly and are saved directly. This requires that the data masking mode is set to Individual.
When this is not so, you will get a message as shown below. Although you will be able to save your input, it will not take effect until the mode is globally set to Individual.