Unlocking DriveLock Agents temporarily
Using temporary unlocking, you can quickly and temporarily allow a connected DriveLock Agent to access locked drives, devices or applications and/or disable Microsoft Defender control.
This also works for multiple DriveLock Agents.
Example: you have locked all USB drives by default, but an end user needs immediate access to their USB drive so they can show their presentation. Using agent remote control, the user gets access to their USB drive within minutes.
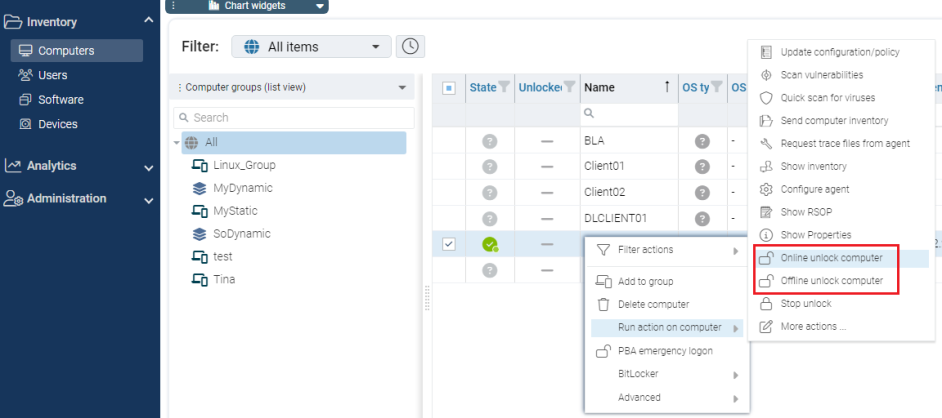
In the DriveLock Operations Center (DOC), use the context menu command Online unlock computer under Run action on computer (see figure). After opening the DOC Companion, follow the steps below. This also applies to the context menu command Offline unlock computer.
Proceed as follows in the DriveLock Management Console (DMC ):
-
Either click the Unlock temporarily button in the agent's properties dialog or the menu command Unlock temporarily... from the context menu. If you want to unlock multiple agents, open the menu command Unlock multiple agents... in the context menu of the Agent remote control node using the Temporary unlock... menu command.
-
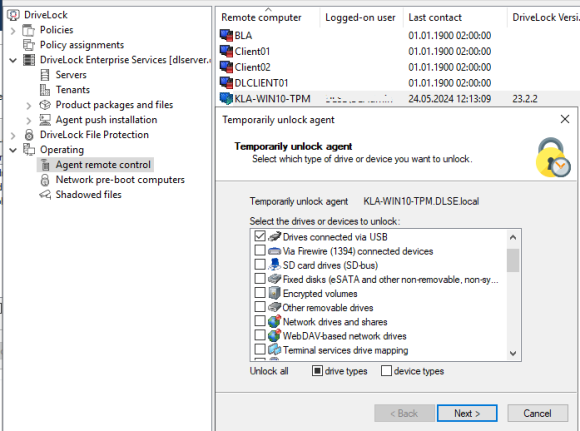
The Temporarily unlock agent wizard opens. In the first dialog, select the drives or devices to unlock so that only the ones you authorize are unlocked.
Example: If you want to temporarily unlock an USB flash drive, check the Drives connected via USB box. -
Now specify the options for drive control. Extended access can be given temporarily by setting the following options for drives:
-
Disable file filtering during the unlock period: Allow access to files or file types that are otherwise blocked by a file filter.
-
Disable enforced encryption: Allow access to drives for which enforced encryption has been activated. Further information on enforced encryption can be found here.
-
Force accepting usage policy before drive can be accessed: The user must agree to a configured usage policy before the drive is unlocked.
-
Disable drive scan: If a drive scan has been configured (in the drive whitelist rules), you can disable it here.
-
-
If you are using application control, you can configure settings in the next dialog to disable it during unlocking as well. In addition, you can specify whether application files are added to the local hash database during this unlock period, and if so, which ones.
The option Require user approval for all files after unlock period ends provides a manual check of all previously "learned" applications before they are finally added to the local application database and therefore unlocked.
-
If you want to Disable Microsoft Defender control, you can specify this in the next dialog. Further information on Microsoft Defender Management can be found here.
Please note that this does not disable Microsoft Defender, only DriveLock's management of Defender settings.
-
Lastly, configure the unlock period, either in minutes or until a specific date and time.
Additionally, you can enter a text (e.g. the reason for the unlock) at this point. This text is also stored in the event and can be evaluated via reporting.
-
The unlocking starts immediately after you clicked Finish. If you have configured a user notification, it will be displayed on the agent.
You can also terminate the unlock prematurely by clicking Finish unlock. If applicable, a confirmation will be displayed also.
Temporarily unlock offline agents
To unlock agents offline that are not connected to your network, you must follow the steps below. This process involves the end user and the administrator, both have different tasks to perform.
Please do the following:
-
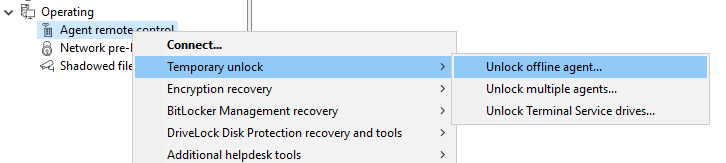
Right-click Agent remote control, then select Temporary unlock, then Unlock offline agent from the context menu.
-
Now enter the password for the offline unlock, or select a certificate, depending on the setting you have specified in the offline unlock settings in your policy. You can import a certificate from a file or from the Windows certificate store on the local computer. To import a certificate from a file, click Import from File and select the certificate file. To import a certificate from the local certificate store, click Import from Store.
-
Enter the computer name and request code provided by the user. DriveLock verifies the data. If the request code was created over an hour ago, this is shown in the Code age box.
-
The code provided by the user to unlock the DriveLock Agent is only valid for one hour. If this time is exceeded, you will need to run the Temporarily Unlock Computer wizard again.
-
Select the permissions and the time period the unlock is valid for.
-
The response code is displayed. The returned response code must be entered by the user in the appropriate spaces.